Now all we need is a fermentation chamber to control out temps!
Well it's only 12.5 gallons ... but we've upgraded from carboy's to a conical fermenter! Totally stoked to add this to our system. The conical will allow is to dump the trub, rack straight to secondary, and even save our yeast! Plus it will be a hell of a lot easier to clean than those carboys. Now all we need is a fermentation chamber to control out temps! 
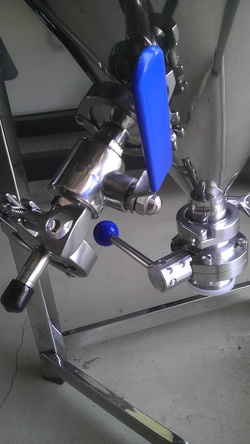
Close up of the racking arm and dump.
0 Comments
Inspired by the American Homebrewers Association cover story in Zymurgy about pumpkin ales we thought it would probably be a good idea to start planning for the next change of season. Of course when the recipe suggested a split batch of with pumpkin on one side and a saison on the other I was hooked. This one took a little extra time though... there was a 10 minute protein rest, a 90 minute mash and a 90 minute boil! But we stuck our mash temp at 154 degrees and the cold crash only took 30 minutes so I think we are (finally) getting a little skilled at this ... only took what 10 brews!! Ah well... we haven't had a major flop yet. After a taste test with different combinations of tangerine extract, a tangerine puree I made, and tangerine zest the consensus was the straight extract produced a tangerine taste that did not overpower the wheat beer and was not sweet and fruity like some of our other attempts at a fruit beer. This was a little surprising to me because the Lost Coast Tangerine Wheat is (in my opinion) both sweet and citrusy which is what I thought we were going for.
Our calculations were also a little surprising... 0.5 tablespoons per gallon!! I suppose we can always add more. We yielded about 11 gallons from the brew so we are splitting the batch in 3. One will get the tangerine extract, one will remain a straight wheat and the 3rd is TBD... and I'm saving my puree for that one! John's been enjoying Lost Coast Brewery's Tangerine Wheat and since we kicked our Raspberry and Honey Wheat long ago we decided to try and do something similar. John found a tangerine extract on-line and during the brew we did a little taste testing it a generic hefeweizen we had in the fridge ... ugg it was terrible. The extract was all bitter, and no sweet fruity goodness.
So after the brew ... which went spectacularly btw... went back to the store to get some real tangerine and make a puree. That is how we did our raspberry and people loved it... although I think I'll tone down the sugar a bit. That beer was way to sweet for me. When my neighbor Fumi got wind of our plans he's volunteered some peaches for the second side... Peach Wheat ... could be a winner. Some pics of the brew day below... taken by my buddy from high school Bryan who happened to be visiting that day. He's got a drum shop in Phoenix called The Drummer's Den if your interested ... but that is another story. If you are new to the craft beer world or just simply like IPA's ... Pliny the Elder this is the standard. It is a robust Imperial / Double IPA full of pine and fruit flavors with a a solid malt backbone to check the bitterness of the hops and is extremely drinkable. Heck ... sounds like a great beer to brew! Of course at 23 oz. of hops this will put all our other beers we've brewed to shame. Which is how we came to rename this beer Pliny the Minor... we got a little nervous will all the hops and decided to back off the dry hopping. We finished with 17.5 oz. in our boil and called it a day. 7 days in primary, 10 in secondary, kegged at 14 and there it sits. I tried it at July 1st (that's about 6 weeks after brewing) and it is still a little harsh on the back end. I heard Russian River lets the Elder sit for up to 6 months before the distribute so we may be in for a long wait! Oh ... and we did a time lapse of the brew .... check out the video on YouTube below! Well things have been warming up here in SoCal so instead of brewing fruity beers in the winter like we've done in the past (i.e. our Passion Modelo) we decided to do it the right way and do it in the springtime. Cousin Joe told me about a Honey Wheat he had at a mortgage conference in Texas so Wheat became the base for our next brew. Following our traditional split bath approach we decided to go for a Honey Chamomile Wheat and a Raspberry Wheat. I found a local buckwheat honey from Aliso Canyon Honey and chamomile at Jimbo's. The raspberries were a little more difficult. They sell raspberry purees in large cans at the home brew stores, but that seemed a little unauthentic to me. Fresh raspberries would have been crazy expensive, but I read good reviews on using frozen berries because they are picked at the peak of the season. Pureeing them can't be that hard right? Trials and Tribulations: Still having some issues keeping our temperatures accurate during our mash. It seems to happen about midway through the mash the wort just skyrockets in temperature. We can get in under control but it is a bit concerning. And we don't know how it is affecting our efficiency. When we tested our OG about half way through our boil we were a bit off ... so we added a pound of corn sugar... forgetting we were going to add a pound and half of honey ... which is basically pure sugar. As a result our OG ended up at 1.074!! It is only supposed to be at 1.061 ... which means we are looking at a ~6.5 - 7.0% ABV!! Guess this is going to by a high octane honey wheat! We did a stop motion video this time around with John's GoPro ... check it out below ... kind of cool... So after what 6 months, 5 brew session and 8 different beers I finally got around to building myself a kegerator ... woo hoo!! Up to this point the beer has all been lagering in John's keezer across the street leaving me high and dry. I know I know... you can pick up a kegerator at Costco for $450 and get them on Craigslist's for less but kind of wanted either something really nice ... i.e. a dual sided commercial Perlick... or build myself one. I found a brand new in the box Vissani wine cooler on Craigslist for $100, the dual draft tower on ebay for $60, paid retail (~$75) for the CO2 tank at the Beverage Factory, $25 for the top and some bolts and Home Depot. Oh ... I almost forgot the Johnson Controller ($65) to get that baby down to a cool 38 degrees.... about $325 out the door. Had to by pass the built in thermostat so the Johnson would work, added a hardwood top with a gloss finish to act as a table and place for the tower to mount and that was it. Add some beer artwork courtesy of my brother and voila... man cave. Might add some casters to make it a bit more portable in the future. Right now I've got the last of the Moose Drool and the Passion Modelo pouring. And since we are out of kegs ... Chahhty Muut is waiting patiently to be kegged with the Vanilla Stout to follow. Couple of pics of things going together... and a couple lessons learned... 1) We used 14 gauge copper wire for the harness... we cut what we though were adequate holes in the frame to feed the wire through... BUT ... it was EXTREMELY difficult to feed the harness around the 90 degree angles of the frame even with the holes. Our frame came 90% together.... but I would highly recommend if you are building one of these from scratch to figure out a way to run your harness as you assmble the frame... maybe even use stranded wire that you can pull through the frame as you go!!! No pics of this part ... we were way too frustrated! 2) Whatever you do... don;t use copper wire for the control panel... you've got to use stranded wire!!! We tried to use the wire we had bought for the harness... only to have to pull it all apart and redo it. The second time around we added quick disconnects as well. 3) Check you valve currents (AC vs. DC)... the valves you see above happened to be DC ... not gonna work in our AC system!!!
The bulk of our parts to make this thing go are in!! Below you see the Love controlers, control box (with the wiring started), wort chiller, Tesco pumps, Asco valves, Banjo buners (there is actually 3), the Johnson Thermostat for the cooler, and 2 bags full of gas line nipples, t's flex lines, ball valves, and wire. This weekend we will hopefully get the rack repaired and ready for assembly
After two rounds of Naval Jelly, a serious applications of paint remover, and about 3 hours of grinding the Brutus is ready for welding! We need to add cross members to the third kettle position, patch some cuts in the frame, finish welding the bottoms of a few of the cross members, and probably add a few support beams just to be safe. After all this thing is going to holding about 500 lbs of boiling water!!!
|